适合人群:已了解 RuoYi 项目结构,想深入理解权限系统的同学
本文是《RuoYi 框架从零到一》系列第 03 篇,基于 RuoYi-Vue 4.x 版本。
建议先读 02 - 项目结构与核心模块。
一、Spring Security 集成原理
RuoYi 的权限系统基于 Spring Security 实现,但做了大量定制化改造——从传统的 Session 认证改为 JWT 无状态认证。
1.1 为什么选择 JWT 而不是 Session?
传统 Session 认证的问题:
- Session 存储在服务器内存中,分布式部署需要 Session 共享(Redis Session 或粘性会话)
- 客户端每次请求都要携带 Cookie,CSRF 攻击风险高
- 前后端分离架构下,Cookie 跨域受限
JWT Token 认证的优势:
- 无状态:Token 自包含用户信息,服务器不存储 Session
- 跨域友好:通过 HTTP Header 传递,不依赖 Cookie
- 可扩展:Token 中可携带自定义数据(如用户 ID、权限列表)
- 性能好:减少数据库查询(用户信息缓存在 Redis 中)
RuoYi 的折中方案:
- Token 本身只是一个 UUID 标识(不是标准的 JWT),真正的用户信息存储在 Redis 中
- 这样既保留了无状态的优点(服务器不存储 Session),又避免了 JWT 无法主动失效的问题(可以直接删除 Redis 中的 Token)
1.2 Spring Security 核心配置
SecurityConfig.java(ruoyi-framework 模块):
1
2
3
4
5
6
7
8
9
10
11
12
13
14
15
16
17
18
19
20
21
22
23
24
25
26
27
28
29
30
31
32
33
34
35
36
37
38
39
40
41
42
43
44
45
46
47
48
49
50
| @EnableGlobalMethodSecurity(prePostEnabled = true, securedEnabled = true)
public class SecurityConfig {
@Autowired
private JwtAuthenticationTokenFilter jwtFilter;
@Autowired
private LogoutSuccessHandlerImpl logoutSuccessHandler;
@Bean
public SecurityFilterChain filterChain(HttpSecurity http) throws Exception {
http
.csrf(csrf -> csrf.disable())
.sessionManagement(session ->
session.sessionCreationPolicy(SessionCreationPolicy.STATELESS))
.authorizeHttpRequests(auth -> auth
.requestMatchers("/login", "/register", "/captchaImage").permitAll()
.requestMatchers("/swagger-ui.html", "/swagger-resources/**").permitAll()
.anyRequest().authenticated()
)
.addFilterBefore(jwtFilter, UsernamePasswordAuthenticationFilter.class)
.logout(logout -> logout
.logoutUrl("/logout")
.logoutSuccessHandler(logoutSuccessHandler)
)
.exceptionHandling(ex -> ex
.authenticationEntryPoint(unauthorizedHandler)
.accessDeniedHandler(accessDeniedHandler)
);
return http.build();
}
@Bean
public PasswordEncoder passwordEncoder() {
return new BCryptPasswordEncoder();
}
}
|
关键配置说明:
- @EnableGlobalMethodSecurity:开启方法级权限注解(
@PreAuthorize、@Secured)
- SessionCreationPolicy.STATELESS:不创建 Session,完全无状态
- jwtFilter:自定义过滤器,从请求 Header 中提取 Token 并验证
- BCryptPasswordEncoder:密码加密算法(单向加密,不可逆)
二、JWT Token 生成与验证流程
2.1 用户登录流程
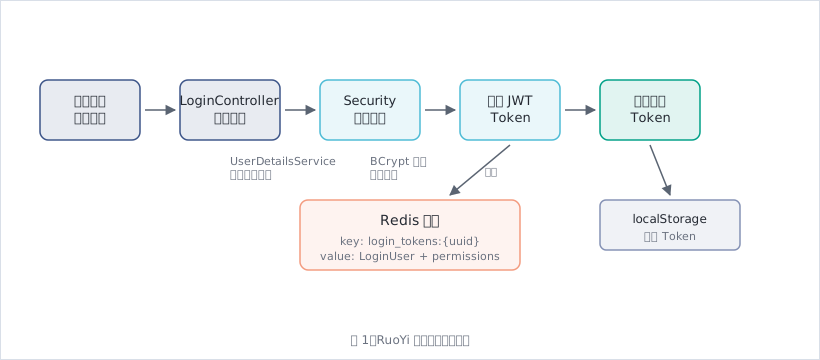
完整流程代码解析:
(1)前端发起登录请求
1
2
3
4
5
6
7
8
9
10
11
12
13
14
|
export function login(username, password, code, uuid) {
const data = {
username,
password,
code,
uuid
}
return request({
url: '/login',
method: 'post',
data: data
})
}
|
(2)LoginController 接收请求
1
2
3
4
5
6
7
8
9
10
11
12
13
14
15
16
17
18
19
20
21
22
| @RestController
public class SysLoginController {
@Autowired
private SysLoginService loginService;
@PostMapping("/login")
public AjaxResult login(@RequestBody LoginBody loginBody) {
AjaxResult ajax = AjaxResult.success();
String token = loginService.login(
loginBody.getUsername(),
loginBody.getPassword(),
loginBody.getCode(),
loginBody.getUuid()
);
ajax.put(Constants.TOKEN, token);
return ajax;
}
}
|
(3)SysLoginService 核心认证逻辑
1
2
3
4
5
6
7
8
9
10
11
12
13
14
15
16
17
18
19
20
21
22
23
24
25
26
27
28
29
30
31
32
33
34
35
36
37
38
39
40
41
| @Service
public class SysLoginService {
@Autowired
private TokenService tokenService;
@Autowired
private AuthenticationManager authenticationManager;
public String login(String username, String password, String code, String uuid) {
validateCaptcha(username, code, uuid);
loginPreCheck(username, password);
Authentication authentication = null;
try {
UsernamePasswordAuthenticationToken authenticationToken =
new UsernamePasswordAuthenticationToken(username, password);
authentication = authenticationManager.authenticate(authenticationToken);
} catch (Exception e) {
if (e instanceof BadCredentialsException) {
AsyncManager.me().execute(AsyncFactory.recordLogininfor(username, Constants.LOGIN_FAIL, "密码错误"));
throw new UserPasswordNotMatchException();
} else {
throw new ServiceException(e.getMessage());
}
}
AsyncManager.me().execute(AsyncFactory.recordLogininfor(username, Constants.LOGIN_SUCCESS, "登录成功"));
LoginUser loginUser = (LoginUser) authentication.getPrincipal();
return tokenService.createToken(loginUser);
}
}
|
(4)UserDetailsServiceImpl 加载用户信息
1
2
3
4
5
6
7
8
9
10
11
12
13
14
15
16
17
18
19
20
21
22
23
24
25
26
27
28
29
30
31
32
| @Service
public class UserDetailsServiceImpl implements UserDetailsService {
@Autowired
private ISysUserService userService;
@Autowired
private SysPermissionService permissionService;
@Override
public UserDetails loadUserByUsername(String username) throws UsernameNotFoundException {
SysUser user = userService.selectUserByUserName(username);
if (user == null) {
log.info("登录用户:{} 不存在.", username);
throw new ServiceException("登录用户:" + username + " 不存在");
} else if (UserStatus.DELETED.getCode().equals(user.getDelFlag())) {
log.info("登录用户:{} 已被删除.", username);
throw new ServiceException("对不起,您的账号:" + username + " 已被删除");
} else if (UserStatus.DISABLE.getCode().equals(user.getStatus())) {
log.info("登录用户:{} 已被停用.", username);
throw new ServiceException("对不起,您的账号:" + username + " 已停用");
}
Set<String> permissions = permissionService.getMenuPermission(user);
return new LoginUser(user.getUserId(), user.getDeptId(), user, permissions);
}
}
|
(5)TokenService 生成 Token
1
2
3
4
5
6
7
8
9
10
11
12
13
14
15
16
17
18
19
20
21
22
23
24
25
26
27
28
29
30
31
32
33
34
35
36
37
38
39
40
41
42
43
| @Service
public class TokenService {
@Autowired
private RedisCache redisCache;
private static final long MILLIS_SECOND = 1000;
private static final long MILLIS_MINUTE = 60 * MILLIS_SECOND;
private static final Long EXPIRE_TIME = 30L;
public String createToken(LoginUser loginUser) {
String token = IdUtils.fastUUID();
loginUser.setToken(token);
setUserAgent(loginUser);
refreshToken(loginUser);
Map<String, Object> claims = new HashMap<>();
claims.put(Constants.LOGIN_USER_KEY, token);
return createToken(claims);
}
public void refreshToken(LoginUser loginUser) {
loginUser.setLoginTime(System.currentTimeMillis());
loginUser.setExpireTime(loginUser.getLoginTime() + EXPIRE_TIME * MILLIS_MINUTE);
String userKey = getTokenKey(loginUser.getToken());
redisCache.setCacheObject(userKey, loginUser, EXPIRE_TIME, TimeUnit.MINUTES);
}
private String getTokenKey(String uuid) {
return Constants.LOGIN_TOKEN_KEY + uuid;
}
}
|
一句话记住:登录成功后,生成一个 UUID 作为 Token,将用户信息(包括权限列表)存入 Redis,Token 返回给前端。
2.2 Token 验证流程
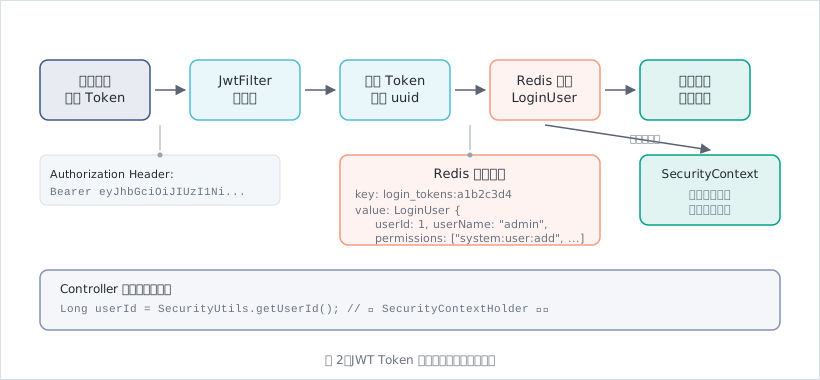
JwtAuthenticationTokenFilter 核心代码:
1
2
3
4
5
6
7
8
9
10
11
12
13
14
15
16
17
18
19
20
21
22
23
24
25
26
27
28
| @Component
public class JwtAuthenticationTokenFilter extends OncePerRequestFilter {
@Autowired
private TokenService tokenService;
@Override
protected void doFilterInternal(HttpServletRequest request, HttpServletResponse response, FilterChain chain)
throws ServletException, IOException {
LoginUser loginUser = tokenService.getLoginUser(request);
if (loginUser != null && SecurityUtils.getAuthentication() == null) {
tokenService.verifyToken(loginUser);
UsernamePasswordAuthenticationToken authenticationToken =
new UsernamePasswordAuthenticationToken(loginUser, null, loginUser.getAuthorities());
authenticationToken.setDetails(new WebAuthenticationDetailsSource().buildDetails(request));
SecurityContextHolder.getContext().setAuthentication(authenticationToken);
}
chain.doFilter(request, response);
}
}
|
TokenService.getLoginUser() 方法:
1
2
3
4
5
6
7
8
9
10
11
12
13
14
15
16
17
18
19
| public LoginUser getLoginUser(HttpServletRequest request) {
String token = getToken(request);
if (StringUtils.isNotEmpty(token)) {
try {
Claims claims = parseToken(token);
String uuid = (String) claims.get(Constants.LOGIN_USER_KEY);
String userKey = getTokenKey(uuid);
LoginUser user = redisCache.getCacheObject(userKey);
return user;
} catch (Exception e) {
log.error("获取用户信息异常'{}'", e.getMessage());
}
}
return null;
}
|
Controller 中获取当前用户:
1
2
3
4
5
6
7
8
9
10
11
12
13
14
15
16
17
18
19
20
| @RestController
@RequestMapping("/system/user")
public class SysUserController extends BaseController {
@PreAuthorize("@ss.hasPermi('system:user:add')")
@PostMapping
public AjaxResult add(@RequestBody SysUser user) {
Long userId = SecurityUtils.getUserId();
String userName = SecurityUtils.getUsername();
LoginUser loginUser = SecurityUtils.getLoginUser();
user.setCreateBy(userName);
return toAjax(userService.insertUser(user));
}
}
|
SecurityUtils 工具类:
1
2
3
4
5
6
7
8
9
10
11
12
13
14
15
16
17
18
19
20
21
22
23
24
25
26
27
28
29
30
31
32
33
34
35
36
37
38
39
40
41
42
43
| public class SecurityUtils {
public static Long getUserId() {
return getLoginUser().getUserId();
}
public static String getUsername() {
return getLoginUser().getUsername();
}
public static Long getDeptId() {
return getLoginUser().getDeptId();
}
public static LoginUser getLoginUser() {
try {
return (LoginUser) getAuthentication().getPrincipal();
} catch (Exception e) {
throw new ServiceException("获取用户信息异常", HttpStatus.UNAUTHORIZED);
}
}
public static Authentication getAuthentication() {
return SecurityContextHolder.getContext().getAuthentication();
}
public static String encryptPassword(String password) {
BCryptPasswordEncoder passwordEncoder = new BCryptPasswordEncoder();
return passwordEncoder.encode(password);
}
public static boolean matchesPassword(String rawPassword, String encodedPassword) {
BCryptPasswordEncoder passwordEncoder = new BCryptPasswordEncoder();
return passwordEncoder.matches(rawPassword, encodedPassword);
}
}
|
一句话记住:每次请求时,JwtFilter 从 Header 提取 Token,从 Redis 加载用户信息,存入 SecurityContextHolder,业务代码通过 SecurityUtils 获取当前用户。
三、权限注解使用
RuoYi 支持多种权限注解,最常用的是 @PreAuthorize。
3.1 @PreAuthorize 注解
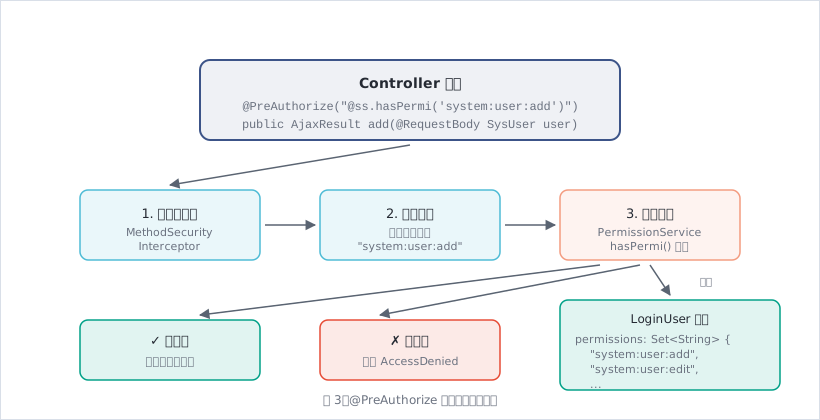
基本用法:
1
2
3
4
5
6
7
8
9
10
11
12
13
14
15
16
17
18
19
20
21
22
23
24
25
26
27
28
29
|
@PreAuthorize("@ss.hasPermi('system:user:add')")
public AjaxResult add(@RequestBody SysUser user) {
return toAjax(userService.insertUser(user));
}
@PreAuthorize("@ss.hasAnyPermi('system:user:add,system:user:edit')")
public AjaxResult save(@RequestBody SysUser user) {
return toAjax(userService.saveUser(user));
}
@PreAuthorize("@ss.hasPermi('system:user:add') and @ss.hasPermi('system:dept:query')")
public AjaxResult addWithDept(@RequestBody SysUser user) {
return toAjax(userService.insertUser(user));
}
@PreAuthorize("@ss.hasRole('admin')")
public AjaxResult deleteAll() {
return toAjax(userService.deleteAll());
}
@PreAuthorize("@ss.hasAnyRoles('admin,editor')")
public AjaxResult batchEdit(@RequestBody List<SysUser> users) {
return toAjax(userService.batchEdit(users));
}
|
PermissionService 实现(@ss 就是这个 Bean):
1
2
3
4
5
6
7
8
9
10
11
12
13
14
15
16
17
18
19
20
21
22
23
24
25
26
27
28
29
30
31
32
33
34
35
36
37
38
39
40
41
42
43
44
45
46
47
48
49
50
51
52
53
54
55
56
| @Service("ss")
public class PermissionService {
public boolean hasPermi(String permission) {
if (StringUtils.isEmpty(permission)) {
return false;
}
LoginUser loginUser = SecurityUtils.getLoginUser();
if (loginUser == null || CollectionUtils.isEmpty(loginUser.getPermissions())) {
return false;
}
return hasPermissions(loginUser.getPermissions(), permission);
}
public boolean hasAnyPermi(String permissions) {
if (StringUtils.isEmpty(permissions)) {
return false;
}
LoginUser loginUser = SecurityUtils.getLoginUser();
if (loginUser == null || CollectionUtils.isEmpty(loginUser.getPermissions())) {
return false;
}
Set<String> authorities = loginUser.getPermissions();
for (String permission : permissions.split(",")) {
if (permission != null && hasPermissions(authorities, permission)) {
return true;
}
}
return false;
}
public boolean hasRole(String role) {
if (StringUtils.isEmpty(role)) {
return false;
}
LoginUser loginUser = SecurityUtils.getLoginUser();
if (loginUser == null || CollectionUtils.isEmpty(loginUser.getUser().getRoles())) {
return false;
}
for (SysRole sysRole : loginUser.getUser().getRoles()) {
String roleKey = sysRole.getRoleKey();
if (role.equals(roleKey)) {
return true;
}
}
return false;
}
private boolean hasPermissions(Set<String> permissions, String permission) {
return permissions.contains(Constants.ALL_PERMISSION) || permissions.contains(permission.trim());
}
}
|
权限标识的命名规范:
1
2
3
4
5
6
7
8
| 模块:功能:操作
示例:
- system:user:add # 系统管理 - 用户管理 - 新增
- system:user:edit # 系统管理 - 用户管理 - 修改
- system:user:remove # 系统管理 - 用户管理 - 删除
- system:user:export # 系统管理 - 用户管理 - 导出
- system:role:list # 系统管理 - 角色管理 - 查询
|
3.2 前端权限控制
前端也需要根据权限控制按钮显示,RuoYi 提供了自定义指令 v-hasPermi。
使用示例(Vue 3):
1
2
3
4
5
6
7
8
9
10
11
12
13
14
15
16
17
18
19
20
21
22
23
24
25
26
27
28
29
30
| <template>
<div>
<!-- 有权限才显示"新增"按钮 -->
<el-button
v-hasPermi="['system:user:add']"
type="primary"
@click="handleAdd"
>
新增
</el-button>
<!-- 拥有任意一个权限即可显示 -->
<el-button
v-hasPermi="['system:user:edit', 'system:user:remove']"
type="success"
@click="handleEdit"
>
编辑
</el-button>
<!-- 角色判断 -->
<el-button
v-hasRole="['admin']"
type="danger"
@click="handleDeleteAll"
>
清空数据
</el-button>
</div>
</template>
|
v-hasPermi 指令实现(ruoyi-ui/src/directive/permission/hasPermi.js):
1
2
3
4
5
6
7
8
9
10
11
12
13
14
15
16
17
18
19
20
21
22
23
| import store from '@/store'
export default {
mounted(el, binding) {
const { value } = binding
const all_permission = "*:*:*"
const permissions = store.getters && store.getters.permissions
if (value && value instanceof Array && value.length > 0) {
const permissionFlag = value
const hasPermissions = permissions.some(permission => {
return all_permission === permission || permissionFlag.includes(permission)
})
if (!hasPermissions) {
el.parentNode && el.parentNode.removeChild(el)
}
} else {
throw new Error(`请设置操作权限标签值`)
}
}
}
|
权限数据从哪里来?
登录成功后,前端调用 /getInfo 接口获取用户信息和权限:
1
2
3
4
5
6
7
8
9
10
11
12
13
14
15
16
| @GetMapping("/getInfo")
public AjaxResult getInfo() {
SysUser user = SecurityUtils.getLoginUser().getUser();
Set<String> roles = permissionService.getRolePermission(user);
Set<String> permissions = permissionService.getMenuPermission(user);
AjaxResult ajax = AjaxResult.success();
ajax.put("user", user);
ajax.put("roles", roles);
ajax.put("permissions", permissions);
return ajax;
}
|
前端将 permissions 存入 Pinia Store,v-hasPermi 指令从 Store 中读取。
3.3 超级管理员特权
RuoYi 中 admin 用户拥有所有权限(即使数据库没有分配权限)。
实现原理:
1
2
3
4
5
6
7
8
9
10
11
12
13
14
15
16
17
18
| public Set<String> getMenuPermission(SysUser user) {
Set<String> perms = new HashSet<>();
if (user.isAdmin()) {
perms.add("*:*:*");
} else {
List<SysRole> roles = user.getRoles();
if (!CollectionUtils.isEmpty(roles)) {
for (SysRole role : roles) {
Set<String> rolePerms = menuService.selectMenuPermsByRoleId(role.getRoleId());
perms.addAll(rolePerms);
}
}
}
return perms;
}
|
判断是否为管理员(SysUser.java):
1
2
3
4
5
6
7
| public boolean isAdmin() {
return isAdmin(this.userId);
}
public static boolean isAdmin(Long userId) {
return userId != null && 1L == userId;
}
|
一句话记住:@PreAuthorize 注解会调用 PermissionService 判断当前用户的 permissions 集合是否包含指定权限,admin 用户自动拥有 *:*:* 超级权限。
四、常见场景与最佳实践
4.1 登录失败次数限制
RuoYi 内置了登录失败锁定机制(防止暴力破解):
1
2
3
4
5
6
7
8
9
10
11
12
13
14
15
16
17
18
19
20
21
22
23
24
25
26
27
28
29
30
31
32
33
34
35
36
37
38
| @Component
public class SysPasswordService {
@Autowired
private RedisCache redisCache;
private int maxRetryCount = 5;
private int lockTime = 10;
public void validate(SysUser user, String password) {
String loginName = user.getUserName();
Integer retryCount = redisCache.getCacheObject(getCacheKey(loginName));
if (retryCount == null) {
retryCount = 0;
}
if (retryCount >= maxRetryCount) {
throw new UserPasswordRetryLimitExceedException(maxRetryCount, lockTime);
}
if (!matches(user, password)) {
retryCount++;
redisCache.setCacheObject(getCacheKey(loginName), retryCount, lockTime, TimeUnit.MINUTES);
throw new UserPasswordNotMatchException();
} else {
clearLoginRecordCache(loginName);
}
}
private String getCacheKey(String loginName) {
return CacheConstants.PWD_ERR_CNT_KEY + loginName;
}
}
|
4.2 Token 自动续期
RuoYi 的 Token 有效期是 30 分钟,但用户持续操作时会自动续期(避免正在使用时突然掉线):
1
2
3
4
5
6
7
8
9
| public void verifyToken(LoginUser loginUser) {
long expireTime = loginUser.getExpireTime();
long currentTime = System.currentTimeMillis();
if (expireTime - currentTime <= MILLIS_MINUTE_TEN) {
refreshToken(loginUser);
}
}
|
4.3 单设备登录(踢人下线)
需求:同一个账号只能在一个设备登录,新登录会踢掉旧登录。
实现思路:
1
2
3
4
5
6
7
8
9
10
11
12
13
14
15
16
17
18
19
20
21
22
| public String login(String username, String password, String code, String uuid) {
LoginUser loginUser = (LoginUser) authentication.getPrincipal();
String oldTokenKey = "user_login_token:" + loginUser.getUserId();
String oldToken = redisCache.getCacheObject(oldTokenKey);
if (oldToken != null) {
redisCache.deleteObject(Constants.LOGIN_TOKEN_KEY + oldToken);
}
String newToken = tokenService.createToken(loginUser);
redisCache.setCacheObject(oldTokenKey, newToken);
return newToken;
}
|
4.4 记住我(7 天免登录)
前端传递 rememberMe: true 参数,后端延长 Token 有效期:
1
2
3
4
5
6
7
8
9
10
11
12
13
14
15
| public String createToken(LoginUser loginUser, boolean rememberMe) {
String token = IdUtils.fastUUID();
loginUser.setToken(token);
long expireTime = rememberMe ? 7 * 24 * 60L : 30L;
loginUser.setLoginTime(System.currentTimeMillis());
loginUser.setExpireTime(loginUser.getLoginTime() + expireTime * MILLIS_MINUTE);
String userKey = getTokenKey(token);
redisCache.setCacheObject(userKey, loginUser, expireTime, TimeUnit.MINUTES);
return createToken(Collections.singletonMap(Constants.LOGIN_USER_KEY, token));
}
|
结语
这篇文章深入剖析了 RuoYi 的认证授权机制:
- Spring Security 集成:从 Session 改为 JWT 无状态认证,关闭 CSRF 和 Session
- 登录流程:UserDetailsService 加载用户 → 密码验证 → 生成 UUID Token → 用户信息存 Redis → 返回 Token
- Token 验证:JwtFilter 拦截请求 → 提取 Token → 从 Redis 加载 LoginUser → 存入 SecurityContextHolder → 放行请求
- 权限注解:@PreAuthorize 注解 → MethodSecurityInterceptor 拦截 → PermissionService 判断 permissions 集合 → 有权限放行,无权限抛异常
- 前端权限:v-hasPermi 指令根据 Store 中的 permissions 控制按钮显示
下一篇预告:我们将深入 RBAC 权限模型的实现——“用户-角色-菜单-部门”四层关系、数据权限(DataScope)的 SQL 拦截机制、菜单树的构建与动态路由生成。
思考与练习
- 尝试在 Redis 中查看
login_tokens:* 的数据结构,理解 LoginUser 对象的序列化
- 阅读
JwtAuthenticationTokenFilter 源码,理解 Spring Security 的过滤器链机制
- 实现一个自定义权限注解
@DataOwner,只允许操作自己创建的数据